Ready to contribute to the world of open-source software? After mastering Git workflows and pull requests, it's time to learn how to contribute to projects you don't own. This tutorial demonstrates the complete forking workflow using GitHub's famous Spoon-Knife practice repository, with detailed terminal output explaining every step for absolute beginners.
🎯 What You'll Learn: In this comprehensive guide, you'll discover:
- Understanding what forking is and why it exists
- The difference between forking and cloning
- How to fork a GitHub repository (hands-on with Spoon-Knife)
- Cloning your forked repository locally
- Making changes to your fork
- Creating pull requests from your fork to the original repository
- Understanding and adding upstream remotes
- The upstream naming convention and why it's used
- Pulling changes from the original (upstream) repository
- Complete workflow for contributing to open-source projects
- Best practices for open-source contributions
Prerequisites: Understanding of Git branching and remote repositories
🍴 Understanding Forking
What is Forking?
Forking: A GitHub (and other Git hosting platforms) feature that creates a complete copy of someone else's repository under your own GitHub account. This is fundamentally different from cloning.
Real-World Analogy: Think of forking like photocopying a recipe book:
- Original Repository: The published cookbook in the library
- Your Fork: Your personal photocopy that you can write notes on and modify
- Pull Request: Suggesting your improvements back to the original author
- Upstream: The connection to the original cookbook for getting updates
Key Point: Forking is a GitHub feature, not a Git command. You can't "fork" using Git on the command line - it must be done through the GitHub web interface.
Fork vs Clone: Critical Differences
| Aspect | Forking | Cloning |
|---|---|---|
| Where It Happens | On GitHub (server-side) | On your computer (local) |
| Creates Copy | On your GitHub account | On your local machine |
| Permissions | You own the fork completely | No write access to original |
| Relationship | GitHub remembers the fork's origin | Git tracks remote as "origin" |
| Use Case | Contributing to others' projects | Working on any repository |
| Push Access | Can push to your fork freely | Can't push to original repo |
Why Forking Exists
The Problem Forking Solves:
Imagine you want to contribute to a popular open-source project like React or TensorFlow. You can't push directly to their repository - you don't have permissions! But you also need a way to:
- Make your changes somewhere
- Show those changes to the project maintainers
- Request that they include your improvements
The Solution: Forking provides:
- ✅ Your own copy where you have full control
- ✅ A visible connection to the original project
- ✅ An easy way to propose changes back (pull requests)
- ✅ A preserved link to get updates from the original
Common Open Source Workflow:
1. Fork the project on GitHub
2. Clone YOUR fork to your computer
3. Make changes and commit
4. Push to YOUR fork
5. Create pull request from your fork to original
6. Maintainers review and potentially merge
🏁 Getting Started: The Spoon-Knife Practice Repository
What is Spoon-Knife?
GitHub created a special repository specifically for practicing forking: octocat/Spoon-Knife
Spoon-Knife Repository Details:
- URL: https://github.com/octocat/Spoon-Knife
- Owner: octocat (GitHub's mascot)
- Purpose: Practice repository for learning forking
- Unique Feature: Thousands of forks and pull requests from learners worldwide
- Safe to Practice: Specifically designed for testing, so don't worry about making mistakes!
Accessing the Spoon-Knife Repository
Let's begin the tutorial by navigating to the repository:
Step 1: Navigate to Spoon-Knife
- Open your web browser
- Go to: https://github.com/octocat/Spoon-Knife
- Take a moment to explore the repository
- Look at the README.md file
- Notice the "Fork" button in the top-right corner
- Check the huge number of existing forks!
💡 Interesting Fact: The Spoon-Knife repository has tens of thousands of forks from people learning Git all over the world. You're joining a global community of learners!
🍴 Forking the Repository
Locating the Fork Button
On the Spoon-Knife repository page:
Visual Guide:
- Look at the top-right corner of the GitHub page
- Find three buttons: Watch, Fork, and Star
- The Fork button shows the current fork count
- Click the Fork button
Creating Your Fork
After clicking Fork:
Fork Creation Process:
- GitHub shows a "Create a new fork" page
- Owner: Automatically set to your GitHub username
- Repository name: Defaults to "Spoon-Knife" (you can change if desired)
- Description: Optional - "My practice fork of Spoon-Knife"
- Copy main branch only: Usually checked (recommended for learning)
- Click "Create fork" button
What Happens:
- GitHub creates a complete copy of Spoon-Knife under YOUR account
- The new repository URL:
https://github.com/YOUR-USERNAME/Spoon-Knife - GitHub remembers this is a fork (shows "forked from octocat/Spoon-Knife")
- You now have full control over this copy!
✅ Verification: After forking, notice the banner at the top showing "forked from octocat/Spoon-Knife". This confirms your fork was created successfully!

📥 Cloning Your Fork Locally
Getting Your Fork's URL
Now that you have your own fork on GitHub:
Steps to Copy URL:
- Make sure you're on YOUR fork (check the URL - it should have YOUR username)
- Click the green "Code" button
- Ensure HTTPS is selected
- Copy the URL (it will look like:
https://github.com/YOUR-USERNAME/Spoon-Knife.git)
⚠️ Critical: Make sure you're cloning YOUR fork, not the original octocat/Spoon-Knife! Check that the URL contains YOUR username.
Cloning to Local Machine
Now let's clone YOUR fork using the terminal:
[23:35:07 centos9@vbox Repo]$ git clone https://github.com/owais-io/Spoon-Knife.git
Cloning into 'Spoon-Knife'...
remote: Enumerating objects: 10, done.
remote: Total 10 (delta 0), reused 0 (delta 0), pack-reused 10 (from 1)
Receiving objects: 100% (10/10), done.
Resolving deltas: 100% (1/1), done.
Command Breakdown:
git clone- Git command to copy a repositoryhttps://github.com/owais-io/Spoon-Knife.git- URL of YOUR fork (not the original!)- Important: Replace "owais-io" with YOUR GitHub username
Clone Output Analysis:
| Output Line | Meaning |
|---|---|
| Cloning into 'Spoon-Knife'... | Creating local directory named "Spoon-Knife" |
| remote: Enumerating objects: 10 | GitHub is preparing 10 Git objects to send |
| remote: Total 10 (delta 0, reused 0) | 10 objects total, no compressed differences |
| pack-reused 10 (from 1) | 10 objects reused from packfile #1 (efficient transfer) |
| Receiving objects: 100% (10/10) | All 10 objects successfully downloaded |
| Resolving deltas: 100% (1/1) | Processing compressed changes (1 delta resolved) |
Entering the Cloned Repository
[23:36:23 centos9@vbox Repo]$ cd Spoon-Knife/
Command Explanation:
cd Spoon-Knife/- Change directory into the newly cloned repository- Result: Your terminal prompt should now show you're inside the Spoon-Knife directory
🔍 Exploring the Forked Repository
Checking Repository Status
Let's verify everything is set up correctly:
[23:38:47 centos9@vbox Spoon-Knife]$ git status
On branch main
Your branch is up to date with 'origin/main'.

nothing to commit, working tree clean
Status Output Analysis:
- "On branch main" - Currently on the main branch
- "up to date with 'origin/main'" - Your local copy matches your fork on GitHub
- "nothing to commit" - No changes have been made yet
- "working tree clean" - No uncommitted changes
Viewing Commit History
Let's see the existing commits in the repository:
[23:38:50 centos9@vbox Spoon-Knife]$ git log
commit d0dd1f61b33d64e29d8bc1372a94ef6a2fee76a9 (HEAD -> main, origin/main, origin/HEAD)
Author: The Octocat <octocat@nowhere.com>
Date:   Wed Feb 12 15:20:44 2014 -0800

    Pointing to the guide for forking

commit bb4cc8d3b2e14b3af5df699876dd4ff3acd00b7f
Author: The Octocat <octocat@nowhere.com>
Date:   Tue Feb 4 14:38:36 2014 -0800

    Create styles.css and updated README

commit a30c19e3f13765a3b48829788bc1cb8b4e95cee4
Author: The Octocat <octocat@nowhere.com>
Date:   Tue Feb 4 14:38:24 2014 -0800

    Created index page for future collaborative edits
Commit History Insights:
| Element | Details | Significance |
|---|---|---|
| Latest Commit Hash | d0dd1f61b33d... | Unique identifier for this commit |
| HEAD Pointer | HEAD -> main | Currently viewing this commit |
| Remote Tracking | origin/main, origin/HEAD | Remote branch pointers (your fork) |
| Author | The Octocat | Original commits from GitHub's octocat |
| Dates | February 2014 | Original repository is over 10 years old! |
💡 Historical Note: These commits are from 2014! The Spoon-Knife repository has been helping developers learn forking for over a decade.
Checking Current Branch
[23:38:50 centos9@vbox Spoon-Knife]$ git branch
* main
Branch Output:
* main- The asterisk (*) indicates you're currently on the main branch- This is the only local branch at the moment
- The original repository uses "main" as the default branch
Examining Remote Configuration
[23:40:29 centos9@vbox Spoon-Knife]$ git remote -v
origin	https://github.com/owais-io/Spoon-Knife.git (fetch)
origin	https://github.com/owais-io/Spoon-Knife.git (push)
Remote Configuration Analysis:
origin- Default name for the remote repository you cloned fromhttps://github.com/owais-io/Spoon-Knife.git- URL of YOUR fork (not the original)(fetch)- Used when pulling/fetching updates(push)- Used when pushing your changes
Critical Understanding: When you clone YOUR fork, Git automatically sets YOUR fork as "origin". The original octocat/Spoon-Knife is NOT configured yet. We'll add it as "upstream" later!
Viewing Repository Contents
[23:40:29 centos9@vbox Spoon-Knife]$ ls
index.html  README.md  styles.css
Repository Files:
- index.html - A simple HTML page
- README.md - Project description and information about forking
- styles.css - CSS styling for the HTML page
Let's look at the README:
[23:44:17 centos9@vbox Spoon-Knife]$ cat README.md
### Well hello there!

This repository is meant to provide an example for *forking* a repository on GitHub.

Creating a *fork* is producing a personal copy of someone else's project. Forks act as a sort of bridge between the original repository and your personal copy. You can submit *Pull Requests* to help make other people's projects better by offering your changes up to the original project. Forking is at the core of social coding at GitHub.

After forking this repository, you can make some changes to the project, and submit [a Pull Request](https://github.com/octocat/Spoon-Knife/pulls) as practice.

For some more information on how to fork a repository, [check out our guide, "Forking Projects""](http://guides.github.com/overviews/forking/). Thanks! :sparkling_heart:
README Content Highlights:
- Explains what forking is
- Describes forks as a "bridge" between original and your copy
- Mentions Pull Requests as the way to contribute back
- Encourages practicing by submitting a PR
- Links to official GitHub forking guide
Perfect! The README itself explains forking - meta learning at its finest!
✏️ Making Changes to Your Fork
Modifying the README
Let's add our own content to demonstrate that we can modify our fork:
[23:44:38 centos9@vbox Spoon-Knife]$ nano README.md
Editor Note:
- Opens the README.md file in the nano text editor
- You can use any text editor you prefer (vim, emacs, VS Code, etc.)
After editing, let's see what we added:
[23:44:41 centos9@vbox Spoon-Knife]$ cat README.md
### Well hello there!

This repository is meant to provide an example for *forking* a repository on GitHub.

Creating a *fork* is producing a personal copy of someone else's project. Forks act as a sort of bridge between the original repository and your personal copy. You can submit *Pull Requests* to help make other people's projects better by offering your changes up to the original project. Forking is at the core of social coding at GitHub.

After forking this repository, you can make some changes to the project, and submit [a Pull Request](https://github.com/octocat/Spoon-Knife/pulls) as practice.

For some more information on how to fork a repository, [check out our guide, "Forking Projects""](http://guides.github.com/overviews/forking/). Thanks! :sparkling_heart:

ADDED TESTING CHANGES FOR FORK
What Changed:
- Added a new line at the end: "ADDED TESTING CHANGES FOR FORK"
- This demonstrates we have full control over our fork
- Original repository is unaffected by our changes
📝 Committing Changes to Your Fork
Staging the Modified File
[23:44:41 centos9@vbox Spoon-Knife]$ git add .
Command Explanation:
git add .- Stage all modified files in the current directory- Alternative: Could use
git add README.mdto stage only the README - Purpose: Prepare changes for committing
Creating a Commit
[23:45:07 centos9@vbox Spoon-Knife]$ git commit -m "updated readme"
[main 7536dd8] updated readme
 1 file changed, 2 insertions(+)
Commit Output Breakdown:
[main 7536dd8]- Commit created on main branch with hash 7536dd8updated readme- Commit message describing the change1 file changed- README.md was modified2 insertions(+)- Two lines were added (the new line + blank line)
Important Understanding: This commit exists ONLY on your local machine right now. Neither your GitHub fork nor the original repository knows about it yet!
🚀 Pushing Changes to Your Fork
Pushing to GitHub
Now let's send our commit to YOUR fork on GitHub:
[23:45:07 centos9@vbox Spoon-Knife]$ git push
Username for 'https://github.com': owais-io
Password for 'https://owais-io@github.com':
Enumerating objects: 5, done.
Counting objects: 100% (5/5), done.
Delta compression using up to 4 threads
Compressing objects: 100% (3/3), done.
Writing objects: 100% (3/3), 375 bytes | 375.00 KiB/s, done.
Total 3 (delta 1), reused 0 (delta 0), pack-reused 0 (from 0)
remote: Resolving deltas: 100% (1/1), completed with 1 local object.
To https://github.com/owais-io/Spoon-Knife.git
   d0dd1f6..7536dd8  main -> main
Push Process Analysis:
| Phase | Output | What's Happening |
|---|---|---|
| Authentication | Username/Password prompt | GitHub verifying your identity |
| Enumeration | Enumerating objects: 5 | Git identifying what needs to be sent |
| Compression | Delta compression using 4 threads | Compressing data for efficient transfer |
| Transfer | Writing objects: 100% (3/3), 375 bytes | Uploading compressed objects to GitHub |
| Processing | Resolving deltas: 100% (1/1) | GitHub processing compressed changes |
| Confirmation | d0dd1f6..7536dd8 main -> main | Updated from commit d0dd1f6 to 7536dd8 |
✅ Success! Your changes are now on YOUR fork on GitHub. You can verify by visiting https://github.com/YOUR-USERNAME/Spoon-Knife in your browser.
Verifying on GitHub
Steps to Verify:
- Go to YOUR fork:
https://github.com/YOUR-USERNAME/Spoon-Knife - Look at the README.md file on the GitHub website
- You should see your added line: "ADDED TESTING CHANGES FOR FORK"
- Notice the commit message "updated readme" appears in the commit history
Important Observation:
- YOUR fork has the changes
- The ORIGINAL octocat/Spoon-Knife does NOT have your changes
- This is the beauty of forking - you can experiment without affecting the original!
🔄 Creating a Pull Request from Your Fork
Understanding Pull Requests from Forks
Pull Request from Fork: A special type of pull request that proposes changes from YOUR fork back to the ORIGINAL repository.
The Process:
- You make changes in your fork
- You push those changes to your fork on GitHub
- You create a pull request from your fork to the original
- Original repository maintainers review your changes
- They decide whether to merge your contributions
Real-World Analogy: Think of it like submitting an article to a magazine:
- Your fork: Your personal draft workspace
- Your changes: The article you wrote
- Pull request: Submission to the magazine editor
- Review: Editor reviews your submission
- Merge: Editor publishes your article (or rejects it)
Navigating to the Original Repository
# Terminal comment indicates navigating back to original repo
# https://github.com/octocat/Spoon-Knife
Steps:
- Go to the ORIGINAL repository:
https://github.com/octocat/Spoon-Knife - Look for the "Pull requests" tab at the top
- Click on "Pull requests"
Viewing Existing Pull Requests
When you click on the Pull requests tab, you'll see:
What You'll Observe:
- Huge list of pull requests - Thousands of learners have practiced here!
- Most are from forks (notice the fork icons)
- Many different usernames and changes
- This demonstrates the global learning community
💡 Learning Insight: Don't be overwhelmed by the thousands of PRs. This repository is specifically designed for practice, so everyone's PRs accumulate here. In real projects, there would be far fewer.
Initiating Pull Request Creation
Steps to Start:
- Click the "New pull request" button (usually green)
- GitHub shows the comparison page
- Important: By default, it tries to compare branches within the same repo
Comparing Across Forks
Here's the critical step that differs from regular pull requests:
Finding "compare across forks":
- Look for the text "compare across forks" (usually near the branch selectors)
- Click on "compare across forks"
- This enables comparing your fork with the original repository
💡 Why This Option Exists: GitHub knows the Spoon-Knife repository is frequently forked, so it provides this special option to easily create pull requests from forks back to the original.
Selecting Source and Target Branches
After enabling "compare across forks", you'll see four dropdown menus:
Branch Selection:
| Dropdown | What to Select | Meaning |
|---|---|---|
| Base repository | octocat/Spoon-Knife | The original repository (target) |
| Base branch | main | Branch in original repo to merge into |
| Head repository | YOUR-USERNAME/Spoon-Knife | Your fork (source of changes) |
| Compare branch | main | Branch in your fork with changes |
Visual Representation:
Base: octocat/Spoon-Knife (main) ← Head: YOUR-USERNAME/Spoon-Knife (main)
      [Original Repository]              [Your Fork]
Reviewing Your Changes
After selecting the branches, GitHub shows:
Comparison View:
- "Able to merge" - Green checkmark indicating no conflicts
- Diff view - Shows your additions in green
- Files changed tab - Lists all modified files (README.md in our case)
- Commits tab - Shows your "updated readme" commit
Scroll down to see:
- Exact lines you added (highlighted in green)
- Lines you removed (if any, highlighted in red)
- Context lines around your changes
Creating the Pull Request
Steps:
- Review your changes one final time
- Click "Create pull request" button
- A form appears for PR details
Fill in Pull Request Details:
- Title: "Testing fork pull request" or "Practice contribution from fork"
- Description: Explain your changes
## What I Changed
Added a test line to the README as practice for the forking workflow.

## Purpose
Learning how to contribute to open-source projects through forking.
- Click "Create pull request" button
🎉 Pull Request Created! You've successfully created a pull request from your fork to the original repository. You can now see your PR in the list with thousands of others!
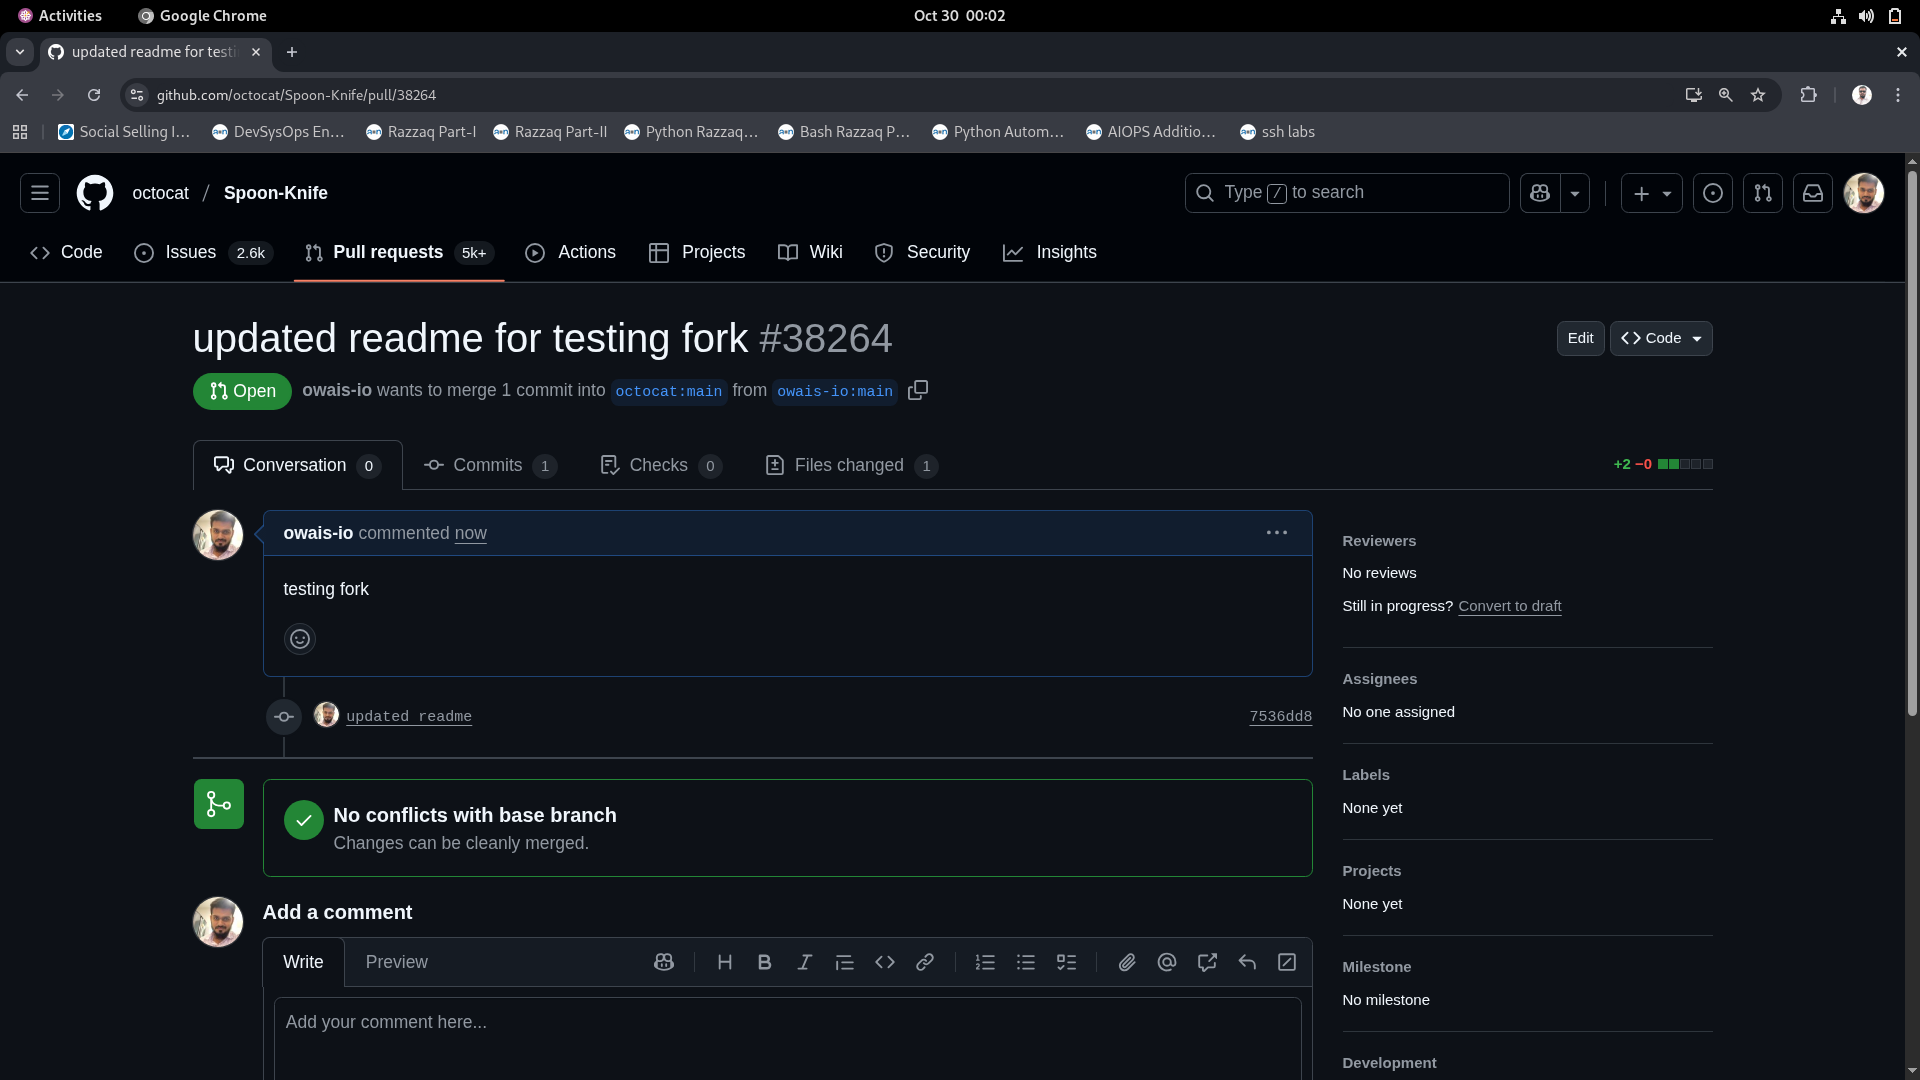
Understanding Your Pull Request Status
After creating the PR, you'll see:
Pull Request Page Shows:
- Status: Open (waiting for review)
- Your username and branch → Original repo and branch
- Merge status: Whether it can be automatically merged
- Conversation tab: For discussion about the PR
- Commits tab: Your commits included in this PR
- Files changed tab: Diff view of all changes
Important Reality Check:
- The Spoon-Knife repository receives thousands of practice PRs
- Your PR will likely NOT be merged (and that's okay!)
- The repository is specifically for practice, not actual contributions
- The maintainers occasionally clean up old PRs
💡 Learning Purpose: The goal here is to learn the workflow, not to actually contribute to Spoon-Knife. In real open-source projects, your meaningful contributions WILL be reviewed and potentially merged!
🔗 Understanding and Adding Upstream Remote
What is Upstream?
Upstream Remote: A Git remote that points to the ORIGINAL repository that you forked from.
Current Setup:
- origin → Your fork (e.g.,
owais-io/Spoon-Knife) - upstream → Original repository (e.g.,
octocat/Spoon-Knife) - NOT SET YET
Why You Need Upstream:
- ✅ Stay Updated: Pull changes from the original project
- ✅ Sync Your Fork: Keep your fork in sync with upstream developments
- ✅ Avoid Conflicts: Reduce merge conflicts when creating PRs
- ✅ Best Practice: Standard workflow for fork-based development
Analogy: Think of upstream like subscribing to updates:
- origin (your fork): Your personal notebook copy
- upstream (original): The textbook that gets new editions
- Syncing: Updating your notebook when a new edition comes out
Checking Current Remotes
Before adding upstream, let's see what we have:
[00:06:48 centos9@vbox Spoon-Knife]$ git remote -v
origin	https://github.com/owais-io/Spoon-Knife.git (fetch)
origin	https://github.com/owais-io/Spoon-Knife.git (push)
Current State:
- Only origin is configured
- Points to YOUR fork
- No connection to the original octocat/Spoon-Knife yet
Getting Detailed Remote Information
[00:06:48 centos9@vbox Spoon-Knife]$ git remote show origin
* remote origin
  Fetch URL: https://github.com/owais-io/Spoon-Knife.git
  Push  URL: https://github.com/owais-io/Spoon-Knife.git
  HEAD branch: main
  Remote branch:
    main tracked
  Local branch configured for 'git pull':
    main merges with remote main
  Local ref configured for 'git push':
    main pushes to main (up to date)
Detailed Output Breakdown:
| Information | Value | Meaning |
|---|---|---|
| Fetch URL | https://github.com/owais-io/... | Where Git pulls updates from |
| Push URL | https://github.com/owais-io/... | Where Git pushes commits to |
| HEAD branch | main | Default branch on the remote |
| Remote branch tracked | main tracked | Git is monitoring origin/main |
| Pull configuration | main merges with remote main | git pull merges origin/main into local main |
| Push status | up to date | No unpushed local commits |
Adding Upstream Remote
Now let's add the original repository as "upstream":
[00:07:06 centos9@vbox Spoon-Knife]$ git remote add upstream https://github.com/octocat/Spoon-Knife.git
Command Breakdown:
git remote add- Command to add a new remote repositoryupstream- Name we're giving to this remotehttps://github.com/octocat/Spoon-Knife.git- URL of the ORIGINAL repository
⚠️ Important: Make sure you're using the ORIGINAL repository URL (octocat/Spoon-Knife), not your fork!
Understanding the "Upstream" Naming Convention
Why "upstream"?
The name "upstream" is a convention, not a requirement. Here's what you need to know:
Technical Truth:
- You COULD name it anything:
original,source,parent,central, etc. - Git doesn't care what you name remotes
git remote add thebigcheese https://github.com/octocat/Spoon-Knife.gitwould work
Why "upstream" is Standard:
- Industry Convention: Virtually all developers use "upstream" for the original repo
- Intuitive Metaphor: "Upstream" = source/origin of a river; changes flow downstream
- Documentation: Most tutorials and documentation assume you use "upstream"
- Team Consistency: Everyone understands what "upstream" means
- Tooling: Some Git tools expect "upstream" naming
River Analogy:
[Upstream] Original Repository (source)
    ↓
[Downstream] Your Fork (water flows to you)
    ↓
[Local] Your Computer (final destination)
Best Practice: Always use "upstream" for the original repository. Your future self and collaborators will thank you!
Common Remote Names:
- origin: Your fork (or the repo you cloned from)
- upstream: The original repository you forked from
- production: Production deployment server (advanced use)
- collaborator-name: A colleague's fork (less common)
Verifying Upstream Configuration
Let's check that upstream was added:
[00:11:44 centos9@vbox Spoon-Knife]$ git remote -v
origin	https://github.com/owais-io/Spoon-Knife.git (fetch)
origin	https://github.com/owais-io/Spoon-Knife.git (push)
upstream	https://github.com/octocat/Spoon-Knife.git (fetch)
upstream	https://github.com/octocat/Spoon-Knife.git (push)
Perfect Setup:
- origin → Your fork (owais-io/Spoon-Knife)
- upstream → Original repo (octocat/Spoon-Knife)
- Both configured for fetch and push operations
Examining Upstream Details
[00:11:44 centos9@vbox Spoon-Knife]$ git remote show upstream
* remote upstream
  Fetch URL: https://github.com/octocat/Spoon-Knife.git
  Push  URL: https://github.com/octocat/Spoon-Knife.git
  HEAD branch: main
  Remote branches:
    change-the-title new (next fetch will store in remotes/upstream)
    main             new (next fetch will store in remotes/upstream)
    test-branch      new (next fetch will store in remotes/upstream)
  Local ref configured for 'git push':
    main pushes to main (fast-forwardable)
Upstream Details Analysis:
| Element | Details | Significance |
|---|---|---|
| Fetch URL | octocat/Spoon-Knife | Can pull updates from original |
| Remote Branches | change-the-title, main, test-branch | Original repo has 3 branches |
| New Branches | Next fetch will store in remotes/upstream | Haven't fetched yet, will on next pull |
| Push Config | fast-forwardable | Could push to upstream (but shouldn't!) |
⚠️ Important Note: Even though the output shows push configuration for upstream, you typically should NOT push directly to upstream. You don't have permissions, and that's not the proper workflow. Always push to your fork (origin) and create pull requests!
🔄 Pulling Changes from Upstream
Why Pull from Upstream?
Scenario: The original repository gets updates after you forked it. Your fork is now out of date.
Real-World Examples:
- Bug fixes added to the original project
- New features implemented by maintainers
- Security patches applied
- Documentation improvements
Solution: Pull changes from upstream to keep your fork current.
Workflow:
Original Repo (upstream) → Updates happen
         ↓
Your Fork (origin) ← You pull from upstream
         ↓
Local Clone ← You pull from origin
Checking Current Status
[00:15:55 centos9@vbox Spoon-Knife]$ git status
On branch main
Your branch is up to date with 'origin/main'.

nothing to commit, working tree clean
Status Indicates:
- Currently on main branch
- Synchronized with YOUR fork (origin/main)
- No uncommitted changes
- But: Doesn't tell us about upstream!
Fetching from Upstream
To see if upstream has changes:
[00:17:35 centos9@vbox Spoon-Knife]$ git fetch upstream
Command Explanation:
git fetch upstream- Download updates from the original repository- Does NOT merge - Just fetches the changes
- Safe operation - Won't modify your working files
If there are changes, you'll see output like:
From https://github.com/octocat/Spoon-Knife
 * [new branch]      new-feature -> upstream/new-feature
 * [new branch]      main        -> upstream/main
If no changes (or you're already current), you might see nothing, which is okay!
Pulling from Upstream
To fetch AND merge changes:
[00:17:35 centos9@vbox Spoon-Knife]$ git pull upstream main
Command Breakdown:
git pull- Fetch and merge in one commandupstream- Pull from the original repositorymain- Pull specifically the main branch
Possible Outputs:
If there are updates:
From https://github.com/octocat/Spoon-Knife
 * branch            main       -> FETCH_HEAD
Updating d0dd1f6..abc1234
Fast-forward
 README.md | 5 +++--
 1 file changed, 3 insertions(+), 2 deletions(-)
If already up to date:
From https://github.com/octocat/Spoon-Knife
 * branch            main       -> FETCH_HEAD
Already up to date.
Complete Sync Workflow
Full workflow to sync your fork:
# 1. Fetch updates from upstream (original repo)
git fetch upstream

# 2. Make sure you're on main branch
git checkout main

# 3. Merge upstream changes into your local main
git merge upstream/main
# Or use pull (fetch + merge combined):
git pull upstream main

# 4. Push updated main to YOUR fork on GitHub
git push origin main
What Each Step Does:
| Step | Command | Result |
|---|---|---|
| 1. Fetch | git fetch upstream | Downloads upstream changes, doesn't merge |
| 2. Switch Branch | git checkout main | Ensures you're on the right branch |
| 3. Merge | git merge upstream/main | Integrates upstream changes locally |
| 4. Push | git push origin main | Updates your fork on GitHub |
💡 Pro Tip: Make it a habit to sync your fork with upstream before starting new work. This prevents merge conflicts and ensures you're working with the latest code!
📊 Complete Fork Workflow Diagram
Let's visualize the entire process:
┌─────────────────────────────────────────────────────────────┐
│                     FORK WORKFLOW                           │
└─────────────────────────────────────────────────────────────┘

Step 1: FORK (on GitHub)
┌──────────────────────┐          ┌──────────────────────┐
│  Original Repository │  Fork →  │     Your Fork        │
│  octocat/Spoon-Knife │          │ you/Spoon-Knife      │
└──────────────────────┘          └──────────────────────┘
         ↑                                 ↓
         │                                 │ Clone
         │                                 ↓
         │                        ┌──────────────────────┐
         │                        │   Local Repository   │
         │                        │   (Your Computer)    │
         │                        └──────────────────────┘
         │                                 │
         │                                 │ Make Changes
         │                                 │ Commit
         │                                 ↓
         │                        ┌──────────────────────┐
         │                        │  Push to Your Fork   │
         │                        │    (git push)        │
         │                        └──────────────────────┘
         │                                 │
         │                                 │
         │                                 ↓
         │                        ┌──────────────────────┐
         │           Pull Request │                      │
         └────────────────────────│  Create PR on GitHub │
                                  └──────────────────────┘

Remotes Configuration:
┌──────────┬─────────────────────────────────────┐
│  origin  │ → Your Fork (you/Spoon-Knife)       │
│ upstream │ → Original Repo (octocat/Spoon...)  │
└──────────┴─────────────────────────────────────┘

Syncing with Upstream:
1. git fetch upstream          (Download updates)
2. git merge upstream/main     (Merge into local)
3. git push origin main        (Update your fork)
🎯 Best Practices for Open Source Contribution
Before You Start Contributing
| Practice | Why Important | How To Do It |
|---|---|---|
| Read CONTRIBUTING.md | Projects have specific guidelines | Look for CONTRIBUTING.md in repo root |
| Check Issue Tracker | Avoid duplicate work | Browse existing issues, comment before starting |
| Look for "Good First Issue" | Beginner-friendly tasks | Filter by label "good first issue" or "help wanted" |
| Understand Project License | Legal implications of contribution | Read LICENSE file, understand MIT/GPL/Apache etc. |
| Test Locally First | Don't submit broken code | Run tests, build project, verify changes work |
Fork Management Best Practices
| Do | Don't |
|---|---|
| ✅ Sync with upstream regularly | ❌ Let fork get months out of date |
| ✅ Create feature branches for work | ❌ Work directly on main branch |
| ✅ Keep commits small and focused | ❌ Make massive commits with many changes |
| ✅ Write clear commit messages | ❌ Use vague messages like "fix stuff" |
| ✅ Test before pushing | ❌ Push untested code |
| ✅ Respond to PR feedback promptly | ❌ Ignore maintainer comments |
Pull Request Best Practices
Writing Excellent Pull Request Descriptions:
## What This PR Does
Brief summary of the changes (1-2 sentences)

## Why This Change is Needed
Explain the problem this solves or feature it adds

## How to Test
Step-by-step instructions for reviewers to test your changes

## Checklist
- [ ] Tests pass locally
- [ ] Documentation updated (if needed)
- [ ] No breaking changes
- [ ] Follows project coding style

## Related Issues
Closes #123
Relates to #456
Title Conventions:
- Fix:
fix: correct typo in README - Feature:
feat: add dark mode toggle - Docs:
docs: update installation instructions - Test:
test: add unit tests for auth module
Common Mistakes to Avoid
| Mistake | Why It's Bad | Solution |
|---|---|---|
| Not reading documentation | PR gets rejected for not following rules | Read CONTRIBUTING.md and CODE_OF_CONDUCT.md |
| Making huge PRs | Overwhelming for reviewers, harder to merge | Split into smaller, focused PRs |
| Not syncing with upstream | Merge conflicts, outdated code | Pull from upstream before creating PR |
| Mixing unrelated changes | Hard to review, risk of rejection | One PR per feature/fix |
| Poor commit messages | Unclear what changed and why | Use descriptive, conventional commit messages |
| Not testing | Broken code, failing CI/CD | Test locally, run project's test suite |
📋 Complete Command Cheat Sheet
Forking Workflow Commands
# ============================================
# INITIAL SETUP (Do Once)
# ============================================

# 1. Fork on GitHub (use web interface)
# Navigate to: https://github.com/original-owner/repo
# Click "Fork" button

# 2. Clone YOUR fork
git clone https://github.com/YOUR-USERNAME/repo.git
cd repo

# 3. Add upstream remote
git remote add upstream https://github.com/original-owner/repo.git

# 4. Verify remotes
git remote -v
# Should show:
# origin    → your fork
# upstream  → original repo

# ============================================
# REGULAR WORKFLOW (Repeat for Each Contribution)
# ============================================

# 5. Sync with upstream before starting work
git checkout main
git fetch upstream
git merge upstream/main
git push origin main

# 6. Create feature branch
git checkout -b feature/my-feature

# 7. Make changes, commit
# (edit files)
git add .
git commit -m "feat: add awesome feature"

# 8. Push to YOUR fork
git push origin feature/my-feature

# 9. Create Pull Request on GitHub
# Navigate to YOUR fork on GitHub
# Click "Compare & pull request"
# Fill in PR description
# Submit PR

# ============================================
# KEEPING FORK UPDATED
# ============================================

# Pull latest changes from upstream
git checkout main
git pull upstream main
git push origin main

# Update feature branch with latest main
git checkout feature/my-feature
git merge main
# Or use rebase:
git rebase main

# ============================================
# AFTER PR IS MERGED
# ============================================

# Update local main
git checkout main
git pull upstream main
git push origin main

# Delete feature branch
git branch -d feature/my-feature
git push origin --delete feature/my-feature
Remote Management Commands
# List all remotes
git remote -v

# Add a remote
git remote add <name> <url>
git remote add upstream https://github.com/owner/repo.git

# View detailed remote info
git remote show <name>
git remote show upstream

# Rename a remote
git remote rename <old> <new>
git remote rename upstream original

# Remove a remote
git remote remove <name>
git remote remove upstream

# Change remote URL
git remote set-url <name> <new-url>
git remote set-url origin https://github.com/newuser/repo.git
Syncing Commands
# Fetch from specific remote
git fetch <remote>
git fetch upstream

# Fetch all remotes
git fetch --all

# Pull from specific remote and branch
git pull <remote> <branch>
git pull upstream main

# Merge specific remote branch
git merge <remote>/<branch>
git merge upstream/main

# Rebase on specific remote branch
git rebase <remote>/<branch>
git rebase upstream/main

# Push to specific remote and branch
git push <remote> <branch>
git push origin feature-branch

# Force push (use carefully!)
git push --force origin feature-branch
Branch Management in Fork Workflow
# Create and switch to feature branch
git checkout -b feature/new-feature

# List all branches (local and remote)
git branch -a

# See which branches are tracking remotes
git branch -vv

# Set upstream for current branch
git branch --set-upstream-to=origin/feature

# Delete local branch
git branch -d feature-branch

# Delete remote branch
git push origin --delete feature-branch

# Prune deleted remote branches
git fetch --prune
git remote prune origin
Checking Fork Status
# Check current status
git status

# See commit history
git log

# See commits on your branch not in upstream
git log upstream/main..HEAD

# See commits in upstream not in your branch
git log HEAD..upstream/main

# Compare your branch with upstream
git diff upstream/main

# See who contributed
git shortlog -sn

# Check if fork is behind upstream
git fetch upstream
git rev-list --left-right --count main...upstream/main
🎯 Key Takeaways
✅ Forking and Open Source Contribution Concepts Mastered
-
Forking vs Cloning: Understood that forking is a GitHub feature creating a server-side copy, while cloning downloads to local machine
-
Complete Fork Workflow: Successfully forked Spoon-Knife, cloned it, made changes, and created a pull request
-
Pull Requests from Forks: Learned how to create PRs from your fork to the original repository using "compare across forks"
-
Upstream Remote: Understood the concept and importance of adding the original repo as upstream
-
Upstream Naming Convention: Learned why "upstream" is the standard name and that it's a convention, not a requirement
-
Syncing with Upstream: Mastered pulling changes from the original repository to keep your fork updated
-
Remote Configuration: Properly set up both origin (your fork) and upstream (original repo) remotes
-
Open Source Workflow: Learned industry-standard practices for contributing to projects you don't own
-
Best Practices: Understood code review etiquette, PR descriptions, and proper contribution workflows
-
Real-World Practice: Used GitHub's official Spoon-Knife practice repository to safely learn these skills
🚀 What's Next?
Now that you've mastered forking and open-source contribution, consider exploring:
- Contributing to Real Projects: Find beginner-friendly projects on GitHub
- Advanced Git Topics: Rebasing, cherry-picking, and interactive rebase
- Git Hooks: Automating tasks with pre-commit and pre-push hooks
- GitHub Actions: CI/CD workflows for your contributions
- Semantic Versioning: Understanding version numbers in open-source
- Code Review Skills: Becoming a better reviewer yourself
🎉 Congratulations! You've successfully mastered:
- ✅ Understanding forking and why it exists
- ✅ Forking repositories on GitHub
- ✅ Cloning your fork locally
- ✅ Making changes and pushing to your fork
- ✅ Creating pull requests from forks
- ✅ Adding and using upstream remotes
- ✅ Understanding the upstream naming convention
- ✅ Syncing your fork with the original repository
- ✅ Best practices for open-source contribution
You're now ready to contribute to the global open-source community! Thousands of projects are waiting for contributors like you. Start with projects labeled "good first issue" and work your way up!
💬 Discussion
Ready to start your open-source journey?
- Have you found an open-source project you'd like to contribute to?
- What was the most surprising aspect of the forking workflow?
- Do you understand the difference between origin and upstream?
- Have you synced your fork with upstream successfully?
- What questions do you have about contributing to real projects?
- Are you clear on when to use forking vs direct collaboration?
Remember: Every major open-source contributor started exactly where you are now. The most important step is to start contributing!
